

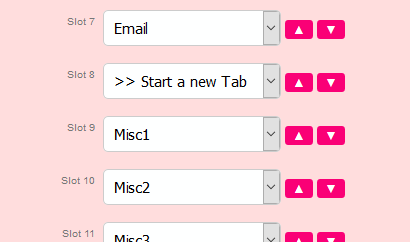
Blipstar provides standard fields for a store's phone, website, email and opening times. But every store locator is different which is why we offer four miscellaneous fields, appropriately titled Misc1, Misc2, Misc3 and Misc4. You can use these fields to add any extra details you like, and the best part is that you can use basic HTML code for full control over how it looks, including the ability to add elements like buttons.
For maximum flexibility you can change the field order (for example if you want to display the address before the name). To achieve this go to Settings > General > Results options and set Field order for Results (and Tabs). Once set to manual you can reorder the fields as desired.
If you upload your data via a spreadsheet then you need to define columns called misc1 (misc2, etc) - if you downloaded the template spreadsheet those columns are already defined!
For those of you who edit your stores online, the misc fields are available in the advanced fields section when you add or edit a store location (you may need to click on the Show all fields button to reveal all available fields if not already visible). You can edit the misc fields using a mini WYSIWYG editor. To switch this option on, go to Settings > General > Misc and set the Advanced text editor option to Yes.

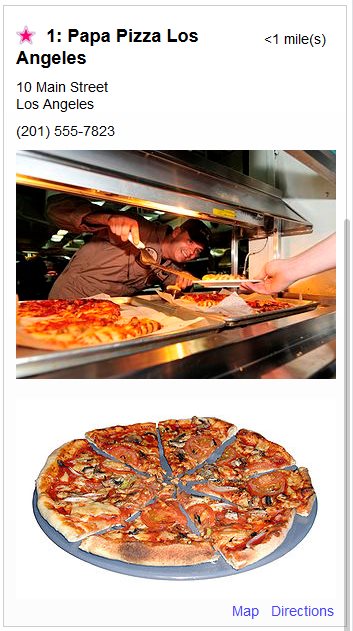
Adding a photo or illustration is really easy using the standard HTML image element. Entering the code below in the Misc1 field...
<img src='https://goo.gl/w8zVTu'>
adds this image of a pizza to the listing, like so...
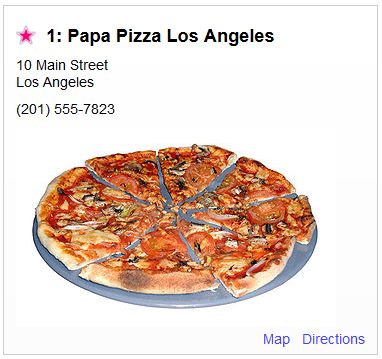
If you want to add more images or text to the store listing you can either enter the info in the other misc fields, or use a HTML line break (<br>) to separate the various elements in the Misc1 field - it's up to you. For example to display two images you could use the following code...
<img src='https://goo.gl/g4r5LJ'><br><br><img src='https://goo.gl/w8zVTu'>
It's not just images you can use to add the wow-factor; why not embed a video, a set of links or even a mini-form?
Let's suppose you run a pizza delivery company. You've set up your store locator so people enter where they live and it lists the nearest takeaway details. Wouldn't it be nice if you could add a large button to each result that links to the online ordering page for that particular restaurant? The good news is, it's easy (if you know a little basic HTML).
<br/>Feeling </b>hungry</b>?<br/><br/><a class='mybutton' href='https://order.mypizzashop.com/shopid=123'>Order online</a>Remember: the link should be tailored for each location; in our example it would point to the online ordering page for that specific takeaway location.
.mybutton {background-color:red;border:1px solid #900;font-size:20px;color:white;padding:10px;}
Once set up the store listing will display the new red button like this...

... and clicking on it takes the user to your online ordering page. Ta da!
If your stores have lots of extra text or images the listing can take up a lot of room, which can become cumbersome to scroll, especially when viewed on a mobile device.
Blipstar provides a solution in the form of Tabs. You can split the listing into two or more tabs, with different fields displayed in different tabs. This is a great way of making lots of information available, but keeping the results relatively compact.
For example to split the listing into two tabs...
Setting up tabs can be a little daunting but it's worth the effort if you have lots to show your customers.
Another option available is to use the compact results mode. You turn this on in Settings > General > Results options and it's called Minimize the results. When engaged, only the store name is displayed initially, and the user can click to reveal the rest of the information about a particular result.
We hope we've inspired you to add some zing to your store locator listings. If you need any assistance just drop us a message via the contact page.
