

 Guide to using icons
Tags and search filtering
Using CSS to style your store locator
Letting others add and edit store locations
Guide to using icons
Tags and search filtering
Using CSS to style your store locator
Letting others add and edit store locations
A common requirement when creating a store locator is the ability to define the relative importance of stores. By default when you do a search the stores are ranked according to distance, with the nearest location appearing at the top. But what happens if you want to promote certain stores so they appear at the top of the results (a bit like a sponsored ad in search results)?
That's where Priority values come in! Put simply, any given set of results are ranked first by Priority, and second by Distance. So imagine, for example, someone uses your locator to search for the five nearest stores to San Francisco. The nearest store, Andrea's, is 1.3 miles away, so it appears at the top, followed by the second nearest store, Bella's, at 1.9 miles away etc (see Example 1 below).
| Results order | Distance from San Francisco |
|---|---|
| Andrea's store | 1.3 miles |
| Bella's store | 1.9 miles |
| Clarissa's store | 2.8 miles |
| Diana's store | 4.2 miles |
| Elaine's store | 8.0 miles |
But you then set up a deal to promote a certain retailer (Clarissa's store) and want it to appear first in the results, even when it isn't the nearest.
Achieving this is very simple - for any stores you want to elevate to the top the results you give them a Priority value.
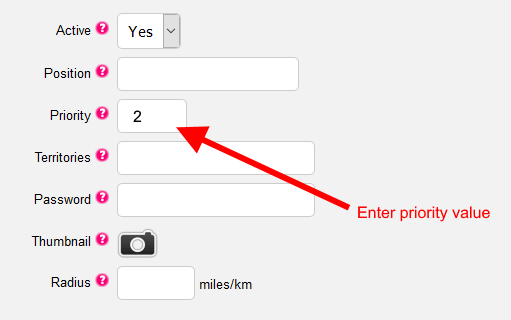
If you upload your data via a spreadsheet then you enter the values in the Priority column. Or, if you edit your stores online, then you fill in the Priority field (click the Show all fields button if you can't see the Priority field) as shown below.
In our example we assign Clarissa's store a Priority of 1. Now, doing the same search for San Francisco would see the Clarissa's store appear at the top, above Andrea's store and Bella's store, despite being 2.8 miles away (see Example 2 below).
| Results order | Distance from San Francisco | Priority value |
|---|---|---|
| Clarissa's store | 2.8 miles | 1 |
| Andrea's store | 1.3 miles | |
| Bella's store | 1.9 miles | |
| Diana's store | 4.2 miles | |
| Elaine's store | 8.0 miles |
The power of Priority values doesn't stop there though, as you can define multiple levels of importance. Say you have three types of store, As, Bs and Cs. You want the As to appear first, followed by the Bs and lastly the Cs. To set this up you could assign all A stores a Priority of 3, all B stores a Priority of 2, and all C stores a Priority of 1 (or leave them blank). Clarissa's store is type A so is given a Priority value of 3. Andrea's store is a type B and gets assigned a 2. Returning to our search for San Francisco, of the top five nearest stores any Priority 3s (e.g. Clarissa's store) would appear at the top , followed by the Priority 2s, followed by the Priority 1s (see Example 3).
| Results order | Distance from San Francisco | Priority value |
|---|---|---|
| Clarissa's store | 2.8 miles | 3 |
| Andrea's store | 1.3 miles | 2 |
| Bella's store | 1.9 miles | 1 |
| Diana's store | 4.2 miles | 1 |
| Elaine's store | 8.0 miles | 1 |
Typically most situations require only one or two different Priority levels, but you can assign up to 998 levels if required to help fine tune your results. Also, if you prefer, you can reverse the ranking direction. By default Priority values are ordered Highest to Lowest (Descending) but you can switch that to be Lowest to Highest (Ascending). This is available in Settings > General > Results options ("Order of Priority values").
You can also set a maximum radius for Priority values to be considered in Settings > General > Results options called "Maximum radius around search focus that Priority values influence results". For example if you set a value of 20 miles, the Priority value of any store more than 20 miles from the search location will be ignored, and it will be treated like a 'normal' store.
It's possible to make stores with a Priority value stand out visually by defining a different background color from normal results. This color is defined in Settings > Styling ("Priority store background color").
Advanced users with a good understanding of CSS can even alter the styling of results based on individual Priority values. Each result is assigned a class name based on its Priority value (e.g. store results with a Priority of 2 have a class name of priority_2). In Settings > Styling you can define these classes in the custom CSS section. For example...
.priority_2 .storename {font-size:20px}
... means that the store name for any stores with a Priority of 2 will have a font size of 20 pixels.
In the above scenarios store locations are ranked by Priority for any given set of results, but overall that set of results is still based on distance. What about if you want a store to always appear in the results, regardless of where the user searches for? Easy! If you assign a Priority value of 999 or above that store will always appear in the list of results. Online-only stores for example are assigned a Priority of 999, but the technique can be applied to any store.
You can even determine the relative order of these "always displayed" locations just like you can with normal stores - a Priority value of 1000 will appear above a Priority value of 999; likewise a 1004 would appear above a 1000. Confused yet?
Blipstar has another trick up its sleeve for affecting search results - a store's Radius value. This technique is best used when doing a radius search (e.g. finding stores with 10 miles of the search location).
Essentially you can define a Radius for an individual store that impacts whether it's included in any given distance-based search. Setting a Radius value of 25 means that any search location within 25 miles of that store will cause the store to appear in the results, regardless of the search distance radius.
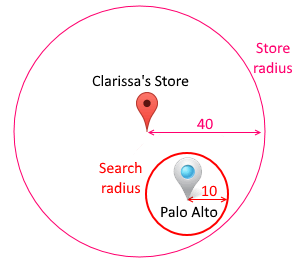
So let's imagine we set the Radius value of Clarissa's Store to be 40 miles.
The user conducts a search to return stores within 10 miles of Palo Alto, CA.
Clarissa's store is 32 miles from Palo Alto (so outside the 10 mile search limit) and normally would not appear in the results.
But because Palo Alto is within the store's radius value of 40 miles, Clarissa's store gets included in the results.
This example is illustrated below:
In effect we've increased the store's "spatial influence". If it takes a while to get your head around the concept, you're not alone! As a rule of thumb, the bigger a store's Radius value the more search results it will appear in.
How do you actually enter store Radius values? The process is similar to Priority values - you can either enter them in a column of your spreadsheet called Radius, or if editing online via the Radius field.
In this tutorial on store locator results we've learned how to:
If you have any issues in setting up your Priority values just drop us an email and we'll be happy to provide assistance.
