In this tutorial we outline the process for creating additional accounts. Why might you need more than one sub-account? There are two main reasons:
Option 1 - Adding a new store locator (with its own location data)

It's easy to set up new accounts.
With the first option you log in to the new sub-account, add locations and deploy it exactly as you would a new Blipstar account.
The only difference is if you upgrade you get a 15% discount.
It also means you can log in via a single set of credentials and switch between accounts (useful if you have several different locators).
- Log in to your Blipstar account.
- Go to "Account" from the main menu.
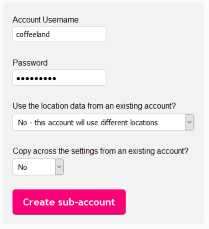
- Select "Add new account".
- Enter a unique username (one that will help you identify the new account).
- Enter a password (you'd enter this if logging in to the new account directly rather than via your main account).
- For the "Use the location data from an existing account?" setting select No.
- For convenience you can copy the settings from your main account rather than starting from scratch. To do that select your main account from the relevant drop down menu.
- Click "Create sub-account" and the new account will be created.
- You should see a new button appear in the top-right: "Switch accounts".
- Click on the Switch accounts button and you'll see a list of all your accounts - simply click on the username of the one you want to use and you'll be logged in.
- Set up your account (edit locations, define settings, deploy it on your site).
- When you click on "Upgrade" you should see a message informing you about the discount for additional accounts - contact support if you don't.
Optional 2 - Adding a different skin (using location data from an existing account)
The second option is slightly different because although you configure settings independently, the new account uses the data from an existing account.
These "linked" accounts do not require upgrading.
They allow unique skins for a locator with their own text labels, icons etc - the most useful scenario being a different language.
You can have as many sub-accounts as you like at no additional cost. For example if your website is available in three languages you could create unique Spanish, French and German skins for your locator (so you'd embed the French store locator on your French site, the Spanish store locator on your Spanish site etc.)
To set up a new skin:
- Sign in to your Blipstar account.
- Go to "Account" from the main menu or the "Account" link (top-right).
- From the options choose "Add new account".
- Enter a unique username and password for the sub-account.
- For "Use the location data from an existing account?" choose your main account (the one with the store location data).
- If you want to use the settings from your main account as a template for the sub-account select it from the drop down.
- Hit the "Create sub-account" button.
- Click on the "Switch accounts" button that will now be available (top-right) - you'll see a list of accounts you can switch to.
- Switch to the new sub-account and you should see a message that this is a special "linked" account. Note that because the account is linked you can't import data.
- Set up the account as needed
- For example to change the wording (e.g. use a different language) go to Settings and click on the "Text" tab.
- Go through the standard Deploy process - when you view the new locator it will use the data from the linked account - if not something is not quite right so contact us and we'll help out!
- You can delete/change the linked account at any time via Settings > General ('Use data from a different account')
So there you have it. Setting up new accounts might appear a little daunting but isn't difficult when you know how. As always, if you need any assistance then contact us - happy creating!


 Tags and search filtering
 Using Priority values to order search results
 Customize your store locator search results
 Using different icons for different store types
